Friday, March 20, 2009

Samples to LA!


At Project Alabama we take great care in sending out our new collections to our showrooms. Here are some photos of us packing our Fall '09 styles to send to our LA showroom! Each piece is carefully steamed & tagged with a hand written tag. Each group is packed up in tissue paper and tied into one neat little package. We nestle all the tissue packed groups into a custom made Project Alabama box that has been stenciled by hand. Off they go! We have already sent a big box off to Italy and to LA. Our NYC show room is just down the street - but they were able to have their set first right after Coterie. Soon we will have all styles up on the site so check back soon!

Project Alabama at Coterie


We have been so busy at Project Alabama preparing to debut our Fall '09 collection at Coterie! Coterie is one of the biggest fashion events in NYC, a huge trade show which lasts for 3 days...every designer imaginable is there. It was a total feast for the eyes as you saw each designer's booth unveiled and caught a glimpse of the coming fashions. Pier 92, booth 1650 was where our new Fall '09 line was previewed!
This year we chose to have our booth hand stenciled by an artist, using hand cut stencils made by our very own designer. Our photos show the set up in process.
We worked day and night to bring it all together; steaming and tagging, stenciling and styling. Our collection looked amazing and all the hard work paid off. We can't wait to share it with the rest of you! Stay tuned for the new line soon to be on our website,
http://www.projectalabama.com/. So far, Fall '09 is looking fabulous.

Wednesday, March 11, 2009

Jeweled


A Sneak Peek at JEWELED from Fall '09!

Jewel ~
1. a cut and polished precious stone; gem.
2. a fashioned ornament for personal adornment, esp. of a precious metal set with gems.
3. a precious possession.
4. an ornamental boss of glass, sometimes cut with facets, in stained-glass work.
5. something resembling a jewel in appearance, ornamental effect, or the like, as a star.


We have taken inspiration from the world of precious gems and all they represent and used it in our JEWELED group for Fall '09. Each piece in this group carefully incorporates jewels & gems with Project Alabama flare.

Tuesday, March 3, 2009

Photo Shoot!


We are in the midst of planning for our next photo shoot for our Fall '09 collection. Taking a slightly different route this time - we know the shoot is going to be amazing because we are in great hands. Our photographer is one of the best in the business! We can't wait to see the final product.

The samples are ready, the location secured, can't wait for tomorrow...

www.philippe-ny.com to take a look at our photographer's portfolio.

30 Days


Look a familiar face! Lookbooks.com is one of the hottest fashion websites out there. It is one of the coolest ways professionals in the industry keep on top of the trends. When our friend told us she was going to be featured on the site for "30 Days of Look - In the Life of Fashion Designer Lady Soule" we had to post about it! Not only does she look AMAZING every single day (how does she come up with those original, gorgeous outfits and manage to look so good?) she also talks about where and how she came up with her look. While mixing vintage, with H & M, with designer duds she will definitely inspire you to be more creative with your wardrobe. Definitely check out the site for her daily outfit updates and quirky, humorous commentary! Love you Lady!


Fashion Week

With Project Alabama's offices right in the center of the garment district, and a hop, skip and a jump away from Bryant Park it is impossible not to get caught up in the excitment of NYC Fashion Week. Even though this action packed week has come and gone - it is hard to forget the hustle and bustle in our neighborhood. All down our street during this incredible week you will find tinted limos parked, even a red carpet or two. There is also a constant stream of very fashionable looking editors, PR girls and members of the press rushing towards the main tent in Bryant Park, (in the highest of heels of course.)

Last year in the main tent they were handing out complimentary cosmopolitans and sunglasses. This year, things were a little more subdued. No cosmos or sunglasses - but the shows still had that high glamor feel and the fashions were thoughtful and inspired.

Each fashion week is a chance to boldy seek out new forms of inspiration for further experimentation and exploration. You will see this is our coming collections...

Tuesday, February 10, 2009

CUE Art Foundation Exhibit

If you happen to be in NYC anywhere from Feb 5th - March 28th you should check out what the CUE Art Foundation is offering art lovers at their most current exhibit. Right in the heart of the Arts District in Chelsea, 511 West 25th to be exact, you will find a most magnificent display of paintings that play with color and texture with reference to pop culture and humor. If you can't be in NYC - then check out their website: http://www.cueartfoundation.org/

Tuesday, February 3, 2009

Anglomania

I'm about three years late on discovering this exhibit at the met, but it wrestled my attention while internet surfing so I had to introduce Anglomania to you. I ran across these dark, seedy images and I immediately had to find out more. Every exhibit seethes with an intriguing story. See images here.
There weren't enough images on the web to satisfy my curiosity, but luckily, there is a
book. I'm definitely ordering this one. After reading the reviews about the exhibition, I am devastated to have missed this show (especially since I was indeed in NY when it was going on). Here's hoping for an encore:(

- Shannon Schmalfeldt

Monday, February 2, 2009

Rich Chocolate Heart Cakes

With Valentine's day just around the corner, I have been testing out various sweet treat recipes to make for the special day! This one was my fave and the addition of rosemary is a great twist on this classic cake. If you can't find heart shaped cake molds, you can always use circular ones instead. The cake recipe is easy to follow and also includes the Chocolate Rosemary Ganache recipe: http://www.marthastewart.com/recipe/rich-chocolate-heart-cakes?backto=true

Happy Valentine's Day!

Friday, January 30, 2009

Valentine's Day Fascinator

Etsy.com is one of the best places online to support hand crafted goods and find unique gifts and ideas. Want a novel Valentine's accessory? Try this fascinator. Don't forget to browse the other items available from Topsy Turvy Design for some more theatrical eye candy.

- Shannon Schmalfeldt

Wednesday, January 28, 2009

Bedazzled

While surfing the Met website, I ran across a special online exhibition. Some selected works of Poiret: King of Fashion can be found here for our enjoyment.  Poiret was a fashion visionary in the late 19th century known for innovations in the construction of garments and for liberating women form their corsets. However much I love our free moving Project Alabama corsets, I am forever thankful that Poiret helped to eliminate the victorian, air restricting variety.

-Shannon Schmalfeldt

Monday, January 26, 2009

Peculiar Pet

While reading through a blog that I subscribe to, http://www.popupstudionyc.blogspot.com, I was introduced to some fascinating photography. The images, taken by Pieter Hugo, are powerful and inspiring. The work is a collection of portraits taken of Nigerians with their peculiar pets. Who new hyenas were so beautiful? Visit Pieter Hugo's Site

- Shannon Schmalfeldt

Friday, December 5, 2008

Wednesday, November 12, 2008

HOPE


We've been super busy at Project Alabama lately updating the website. We now have our newest Green T collection posted. In addition, we have launched our partnership with HOPE organizations. We will be hosting our sample sales online with proceeds benefiting these worthy charities. I'm rather impressed by their credentials. These HOPE charities are some of the rare charities that actually use 90% of their donations towards actual programs... not marketing, print, or other costs that some charities syphon funds into. HOPE worldwide tristate funds children's education programs in the United States, while HOPE foundation is funding a school in Bhuj Gujrat, India. We are looking forward to investing in the futures of the communities that help make Project Alabama possible.

"Education is a human right with immense power to transform. On its foundation rest the cornerstones of freedom, democracy and sustainable human development." - Kofi Annan

See the Green T Spring 09' Collection
Shop the HOPE Benefit Sample Sale

- Shannon Schmalfeldt

Thursday, October 23, 2008

How to Make an Off-The-Shoulder T-shirt

This is one of my favorite projects. It's almost like magic. One takes a beat up old baseball t-shirt and presto... a shirt fit for a night on the town. This project employs our signature "Reverse Appliqué" technique. You can work with the basic Reverse Appliqué as shown or decorate the T with beading or ready-made appliques. The sky is the limit.

Materials Needed :
Patience! :)
1 Fitted (skin tight) Raglan Style T-shirt (baseball shirt)
1 Extra Large Recycled T-shirt (choose a color to be used as trim and reverse fabric)
Store Bought Stencils or
Make Your Own
Newspaper
Embroidery Scissors or tiny sharp scissors
Large Scissors
Needle
Thread
Straight pins
Ruler
Permanent Marker

For Painting:
Spray Adhesive or Photo Mount
Textile paint or Spray paint

Optional:
Fold-over elastic
Sewing Machine

Breakdown of Steps:
First you will need to cut the raglan shirt.  Be sure to start this project with a fitted raglan t-shirt. The arms and body will need to be snug since they are the only things that help keep the shirt on. Lay your Raglan shirt out on a flat surface. Using a ruler measure from the "neck" down along the seam 3 1/2 inches. Make a mark at this measurement. Repeat on the opposite side. Now, using the ruler as a guide, draw a straight line across the front of the shirt connecting the dots. Then draw a line on each sleeve that starts at that measurement and is parallel to the bottom of the sleeve.  Now that your shirt is marked, cut along the lines you just drew. Cut the sleeves so that they are 8 1/2 inches in length for a short sleeve or leave them longer for Fall wear. (See illustrations below.)

Now you're ready to decorate the shirt. Place a piece of old newspaper in the middle of your T-shirt between the front and the back. The paper will prevent any of your stenciled areas from soaking through to the back layer of your T-shirt. Lay out the cut T-shirt flat. You can either trace your stencil on with permanent marker, paint it on using a dry brush technique, or spray paint it as I have done. If you are painting, lightly dust the back of your stencil with photo mount (spray adhesive).  Let the glue dry (10 seconds.) The glue will keep your stencil from shifting. It will also help flatten the stencil to the shirt so that there are no gaps in between the stencil and the garment. Remember, the more stenciled areas on your shirt, the more stitching work to be done. If you are a first timer, I recommend doing just one small stenciling in the top right side.

*Sometimes spray paint doesn't adhere and dry properly on rubbery plastic like ink found on some newer ts. If you have a t-shirt with this thick screen-printing on it, use a spray paint made to paint plastic. That should work.
Before and After
While your stenciling is resting :) , you will need to dissect your other shirt to harvest the scrap material for your reverse backing fabric. See the illustration below. Cut along the red dotted lines. *Cut the hem off carefully right below the stitched hem line. This piece is the trim that will finish your garment so make sure that your cutting is smooth and even.

After cutting your shirt apart you will be left with a really long folded, inch wide strip of fabric from the hem, two sleeves that are cut completely open and lying flat, one huge front piece, and one huge back piece.

When your first shirt is done resting, you can begin stitching the design with a reverse applique method. (Find additional instructions here or here)
Choose a piece of fabric from the above dissection that is a little bit larger than your stenciled area. Pin this jersey fabric on the inside of your shirt behind the stenciled area. Then, thread your needle with quilting or upholstery thread and tie a double knot at the end. Begin stitching around the edge of one of the stenciled shapes on your stencil. Using a
running stitch work around each shape.

Once everything is stitched, pull up the top layer in the center of your design and clip a tiny hole for your scissor to fit in. Now just trim away the top, painted layer on the center of your design. Make sure that you do not cut any closer than 1/8” to your stitching line as the fabric might eventually tear away from the stitching and leave a hole in your beautiful work. Repeat on all stencil shapes that are large enough to trim and still leave 1/8" of paint showing.  (Some of the smaller areas in my design have just been cut up the middle with nothing trimmed away, while others have no cuts at all.)

Lastly, you will need to Finish the top edge of the t-shirt. Being careful not to stretch the t-shirt out of shape, pin the hem strip from your
dissected T (or use the fold-over elastic) around the top. Starting at the back of your shirt, sandwich the T in-between the hem piece. Be sure that the shirt edge fits all the way up inside the folded hem piece. Once pinned in place, secure the hem with a feather stitch, herringbone stitch or other stretchable embroidery stitch. If you are completely over hand work by this point, you can always stitch the hem on using a machine zig zag stitch.

*If you are a seasoned seamstress, you may want to finish the edge with
fold-over elastic. Elastic is kind of tricky as you have to slightly stretch it as you sew. Using elastic is the only way to positively ensure that your T keeps it's shape while you are wearing it. Elastic sewing tutorials here or here.


- Shannon Schmalfeldt

We provide links to other web sites that we think might be helpful to our readers. By providing these links, we are not endorsing the products distributed by publishers at those sites, and we are not responsible for any materials at any other site. We make no representation or warranties with respect to any web site of others. Likewise, the existence of a link to another web site does not imply that the person or organization at that web site endorse any of the materials at this web site.

Getting into the Spirit

(photo of Delilah Jenkins)
I couldn't resist making a Halloween playlist. I plan to have this playing as trick-or-treat background music. 

Want to buy some of these tracks? Click on "iTunes iMix"

- Shannon Schmalfeldt

Wednesday, October 22, 2008

Undecided Voter

Still an undecided voter? Check out this site ontheissues.org. This is the perfect place to see where all the candidates stand on all the issues. I found it especially useful because they fact check and update the facts they list. (Photo by Jeep Novak)

- Shannon Schmalfeldt

Tuesday, October 21, 2008

Remembering Halloween

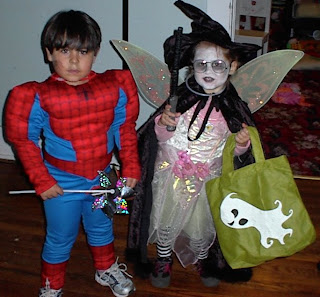
Spiderman with the Harry Potter Beetlejuice Fairy

My sister and I were talking about Halloween costumes and festivities when we were kids. We are both disappointed that we are seeing less and less creative and recycled costumes these days. Our favorite part of the year was imagining and designing our costumes. We had this trunk in the attic of costume parts. It was a literal treasure chest of old clothes, costumes my mom wore as a girl, weird hats, my dad's cap and gown from high school, an old US Navy uniform, my Grandma's prom dress all mixed in with old wigs, costume jewelry, and other odds and ends... everything a kid would need to imagine a character for Halloween. This Halloween trunk was the best! We would dig inside and pull out one or two pieces and present our ideas to the matriarchs of our family. They would add the necessary makeup and re-purposed props to make our designs a reality. One year, I was "Ms Kitty" from "Gunsmoke" (don't ask). The magic trunk produced an old floor length red skirt with ruffle under skirt and a big purple feather for my hair. My mom added a purple bustier from her unmentionables drawer (worn over a sweatshirt to keep me modest and warm). Then all I needed was make-up and a beauty mark. The next year my cousin Jen was a gypsy. The red skirt came back out from the depths of the trunk along with various scarves and a ruffle shirt.

We both miss the Halloween trunk and have vowed to rekindle this tradition with our children and grandchildren. My daughter is five and we have been imagining characters together for the last two years. Each costume has been constructed from things we already own and a little imagination. Her costume at three years old was one of my favorites. She was a Harry Potter, Beetlejuice Fairy... all of her favorite things at once. Last year she was a Kitty Cat Fairy Viking. This year she is planning on wearing an outfit I bought her on a trip to India. She is preparing to be an Indian princess. We've had a lot of fun exploring the Indian culture online and she has already picked out the colors of her Bindi (blue center with gold ring around the outside.)

Make your Halloween a green Halloween. Try making costumes from items lying around the house. Take a trip to the local thrift store and find a treasure trove of ideas using vintage clothes and weird bobbles. If you are not gifted in the way of craftiness and MUST buy a ready made costume, buy a good quality one and save it to possibly use again or reinvent.

*The queen of craft and home, Martha Stewart, has some great ideas on her site for costumes. Her team has come up with a wide range of ideas from super simple no sew costumes (I was the Tulle Ghost last year. I used old sheer curtains on their way to a thrift store instead of Tulle) to more complex crafted identities.

*Thedailygreen.com has some creative ideas to turn your recycling bin refuse into creative characters. I love the little boy's Samurai costume.

If you know of some more great "home made" costume sites please leave their address as a comment.  Only 10 more days to prepare :)  Happy Halloween everyone.

-Shannon Schmalfeldt

Monday, October 20, 2008

How to make a Stencil

Mai's embellished t-shirt celebrating her 5th birthday.

My friend Michi gave me a great tip to make quick stencils. I had always used the method of spray mounting an image on poster board and then laboriously cutting out the design with an exacto knife. Cutting through those thick layers is difficult and time consuming. Well, his time saving tip creates a durable, multi purpose stencil with much less effort.

Once you have a design to make a stencil out of, take the artwork to the local copy center. The copy center will be able to print out your artwork ( they can even print large, poster sized images). After they print your image, have them laminate it. (Be sure that the laminate is no more than 5 ml. I had a 7 ml laminate done once and it was too thick and stiff.) So, now you have a laminated image ready for stencil cutting. Simply use your craft knife to cut and trim away the areas in your design needed to make the stencil. You'll find that cutting through this medium is much much easier than cutting through poster board, stencil plastic, or felt. It also uses fewer blades, which is a money saver. When you are finished cutting, you will have a durable, light weight, thin stencil. I find that these thin, light weight stencils are much easier to anchor with stencil adhesive to fabric and walls (whatever you throw at them), which eliminates the dreaded "under-spray" (paint creeping under the edges of your cut out areas in your stencil creating a blurry transfer).

Materials Needed:
Rotary Mat - to protect work surfaces and to help keep blades sharp
Craft Knife - try to find one with a grip. The metal ones slip around when hands get sweaty.
Laminated Artwork - use your own design laminated at the local copy shop or find a *ready made one.

Break down of Steps:
1. Have stencil artwork printed
2. Have printed artwork laminated

3. Rest your laminated design on you rotary mat. Using a craft knife (I like X-acto brand) cut away the negative areas in your stencil. The "e" in this design had to have "bridges" made to keep the center of the "e" from falling away when cut out.  I left a 1/8 inch strip connecting the center of the "e" at the top and bottom.  See arrows pointing these bridges out below.

4. Stencil everything that will hold still :) To use your stencil, dust the back of the stencil with stencil adhesive or re-positional adhesive. This will help keep your stencil secure and in place when working and helps keep under-spray at bay.

* Be sure that your stencil has an outside border that is large enough to control paint "over-spray. " (paint floating out past the edge of your stencil onto unintended surfaces.) I usually have a 3 inch border around the edge of my stencils. However, if this isn't possible, simple protect areas that you want to be paint free by blocking them off with scraps of paper (great use for junk mail and old magazines) or old fabric. Use tape to secure the position of the "over spray barrier" to your stencil and paint away.


* Here is a link to a tutorial that will teach you to
make a stencil from a picture (adobe photoshop is required.) The site also has some other stencil ideas.

* Dover publications is a gem in the world of clip art. They also have a mailing list that you can join that will email you clip art "samples of the week."

-Shannon Schmalfeldt

Wednesday, September 24, 2008

How to Fold a Fitted Sheet

I was on a mind jumping, internet clicking rampage the other day. I was looking here and then saw an ad for something or another there and clicked it and then saw something there and clicked... you get the idea. Like a magpie, I was gleaning this shiny idea and suddenly switching gears to another one. In the midst of this lunch time killer, I remembered that I need napkins. Somehow my napkin supply keeps shrinking. I have found them in the oddest places (under the kitchen sink as dust rags, in Mai's room as doll blankets, mis-shelved and put away in the bathroom closet) but rarely ever in the table linen drawer. So, I google napkins and see a listing for "napkin folding." Of course I have to look at that, I'm a magpie, remember. With my initial purpose of purchasing napkins a fading memory, I learn to fold beautiful napkins that will wow my guests. Then, my eyes focus on the next heading... "Other Folds." It is in this section that I found something truly amazing. So amazing that I have to share it with you... a video tutorial on how to fold a fitted sheet! I've always been a fitted sheet wadder/roller. I thought folding them in an orderly manner was impossible. Behold...


-Shannon Schmalfeldt