
 This is one of my favorite projects. It's almost like magic. One takes a beat up old baseball t-shirt and presto... a shirt fit for a night on the town. This project employs our signature "Reverse Appliqué" technique. You can work with the basic Reverse Appliqué as shown or decorate the T with beading or ready-made appliques. The sky is the limit.
Materials Needed :
Patience! :)
1 Fitted (skin tight) Raglan Style T-shirt (baseball shirt)
1 Extra Large Recycled T-shirt (choose a color to be used as trim and reverse fabric)
Store Bought Stencils or Make Your Own
Newspaper
Embroidery Scissors or tiny sharp scissors
Large Scissors
Needle
Thread
Straight pins
Ruler
Permanent Marker
For Painting:
Spray Adhesive or Photo Mount
Textile paint or Spray paint
Optional:
Fold-over elastic
Sewing Machine
Breakdown of Steps:
First you will need to cut the raglan shirt. Be sure to start this project with a fitted raglan t-shirt. The arms and body will need to be snug since they are the only things that help keep the shirt on. Lay your Raglan shirt out on a flat surface. Using a ruler measure from the "neck" down along the seam 3 1/2 inches. Make a mark at this measurement. Repeat on the opposite side. Now, using the ruler as a guide, draw a straight line across the front of the shirt connecting the dots. Then draw a line on each sleeve that starts at that measurement and is parallel to the bottom of the sleeve. Now that your shirt is marked, cut along the lines you just drew. Cut the sleeves so that they are 8 1/2 inches in length for a short sleeve or leave them longer for Fall wear. (See illustrations below.)
 Now you're ready to decorate the shirt. Place a piece of old newspaper in the middle of your T-shirt between the front and the back. The paper will prevent any of your stenciled areas from soaking through to the back layer of your T-shirt. Lay out the cut T-shirt flat. You can either trace your stencil on with permanent marker, paint it on using a dry brush technique, or spray paint it as I have done. If you are painting, lightly dust the back of your stencil with photo mount (spray adhesive). Let the glue dry (10 seconds.) The glue will keep your stencil from shifting. It will also help flatten the stencil to the shirt so that there are no gaps in between the stencil and the garment. Remember, the more stenciled areas on your shirt, the more stitching work to be done. If you are a first timer, I recommend doing just one small stenciling in the top right side.
*Sometimes spray paint doesn't adhere and dry properly on rubbery plastic like ink found on some newer ts. If you have a t-shirt with this thick screen-printing on it, use a spray paint made to paint plastic. That should work.
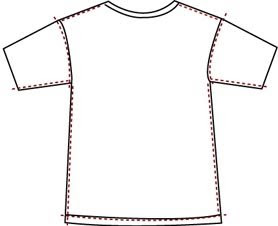
 While your stenciling is resting :) , you will need to dissect your other shirt to harvest the scrap material for your reverse backing fabric. See the illustration below. Cut along the red dotted lines. *Cut the hem off carefully right below the stitched hem line. This piece is the trim that will finish your garment so make sure that your cutting is smooth and even.
After cutting your shirt apart you will be left with a really long folded, inch wide strip of fabric from the hem, two sleeves that are cut completely open and lying flat, one huge front piece, and one huge back piece.
 When your first shirt is done resting, you can begin stitching the design with a reverse applique method. (Find additional instructions here or here)
Choose a piece of fabric from the above dissection that is a little bit larger than your stenciled area. Pin this jersey fabric on the inside of your shirt behind the stenciled area. Then, thread your needle with quilting or upholstery thread and tie a double knot at the end. Begin stitching around the edge of one of the stenciled shapes on your stencil. Using a running stitch work around each shape.
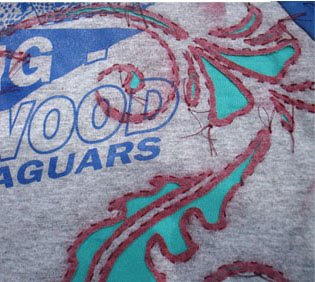 Once everything is stitched, pull up the top layer in the center of your design and clip a tiny hole for your scissor to fit in. Now just trim away the top, painted layer on the center of your design. Make sure that you do not cut any closer than 1/8” to your stitching line as the fabric might eventually tear away from the stitching and leave a hole in your beautiful work. Repeat on all stencil shapes that are large enough to trim and still leave 1/8" of paint showing. (Some of the smaller areas in my design have just been cut up the middle with nothing trimmed away, while others have no cuts at all.)
Lastly, you will need to Finish the top edge of the t-shirt. Being careful not to stretch the t-shirt out of shape, pin the hem strip from your dissected T (or use the fold-over elastic) around the top. Starting at the back of your shirt, sandwich the T in-between the hem piece. Be sure that the shirt edge fits all the way up inside the folded hem piece. Once pinned in place, secure the hem with a feather stitch, herringbone stitch or other stretchable embroidery stitch. If you are completely over hand work by this point, you can always stitch the hem on using a machine zig zag stitch.
*If you are a seasoned seamstress, you may want to finish the edge with fold-over elastic. Elastic is kind of tricky as you have to slightly stretch it as you sew. Using elastic is the only way to positively ensure that your T keeps it's shape while you are wearing it. Elastic sewing tutorials here or here.

First you will need to cut the raglan shirt. Be sure to start this project with a fitted raglan t-shirt. The arms and body will need to be snug since they are the only things that help keep the shirt on. Lay your Raglan shirt out on a flat surface. Using a ruler measure from the "neck" down along the seam 3 1/2 inches. Make a mark at this measurement. Repeat on the opposite side. Now, using the ruler as a guide, draw a straight line across the front of the shirt connecting the dots. Then draw a line on each sleeve that starts at that measurement and is parallel to the bottom of the sleeve. Now that your shirt is marked, cut along the lines you just drew. Cut the sleeves so that they are 8 1/2 inches in length for a short sleeve or leave them longer for Fall wear. (See illustrations below.)
 Now you're ready to decorate the shirt. Place a piece of old newspaper in the middle of your T-shirt between the front and the back. The paper will prevent any of your stenciled areas from soaking through to the back layer of your T-shirt. Lay out the cut T-shirt flat. You can either trace your stencil on with permanent marker, paint it on using a dry brush technique, or spray paint it as I have done. If you are painting, lightly dust the back of your stencil with photo mount (spray adhesive). Let the glue dry (10 seconds.) The glue will keep your stencil from shifting. It will also help flatten the stencil to the shirt so that there are no gaps in between the stencil and the garment. Remember, the more stenciled areas on your shirt, the more stitching work to be done. If you are a first timer, I recommend doing just one small stenciling in the top right side.
*Sometimes spray paint doesn't adhere and dry properly on rubbery plastic like ink found on some newer ts. If you have a t-shirt with this thick screen-printing on it, use a spray paint made to paint plastic. That should work.
Before and After
While your stenciling is resting :) , you will need to dissect your other shirt to harvest the scrap material for your reverse backing fabric. See the illustration below. Cut along the red dotted lines. *Cut the hem off carefully right below the stitched hem line. This piece is the trim that will finish your garment so make sure that your cutting is smooth and even.After cutting your shirt apart you will be left with a really long folded, inch wide strip of fabric from the hem, two sleeves that are cut completely open and lying flat, one huge front piece, and one huge back piece.
 When your first shirt is done resting, you can begin stitching the design with a reverse applique method. (Find additional instructions here or here)
Choose a piece of fabric from the above dissection that is a little bit larger than your stenciled area. Pin this jersey fabric on the inside of your shirt behind the stenciled area. Then, thread your needle with quilting or upholstery thread and tie a double knot at the end. Begin stitching around the edge of one of the stenciled shapes on your stencil. Using a running stitch work around each shape.
 Once everything is stitched, pull up the top layer in the center of your design and clip a tiny hole for your scissor to fit in. Now just trim away the top, painted layer on the center of your design. Make sure that you do not cut any closer than 1/8” to your stitching line as the fabric might eventually tear away from the stitching and leave a hole in your beautiful work. Repeat on all stencil shapes that are large enough to trim and still leave 1/8" of paint showing. (Some of the smaller areas in my design have just been cut up the middle with nothing trimmed away, while others have no cuts at all.)
Lastly, you will need to Finish the top edge of the t-shirt. Being careful not to stretch the t-shirt out of shape, pin the hem strip from your dissected T (or use the fold-over elastic) around the top. Starting at the back of your shirt, sandwich the T in-between the hem piece. Be sure that the shirt edge fits all the way up inside the folded hem piece. Once pinned in place, secure the hem with a feather stitch, herringbone stitch or other stretchable embroidery stitch. If you are completely over hand work by this point, you can always stitch the hem on using a machine zig zag stitch.
*If you are a seasoned seamstress, you may want to finish the edge with fold-over elastic. Elastic is kind of tricky as you have to slightly stretch it as you sew. Using elastic is the only way to positively ensure that your T keeps it's shape while you are wearing it. Elastic sewing tutorials here or here.

- Shannon Schmalfeldt
We provide links to other web sites that we think might be helpful to our readers. By providing these links, we are not endorsing the products distributed by publishers at those sites, and we are not responsible for any materials at any other site. We make no representation or warranties with respect to any web site of others. Likewise, the existence of a link to another web site does not imply that the person or organization at that web site endorse any of the materials at this web site.
No comments:
Post a Comment